dam5s created a branch main in dam5s/kotlin-monorepo-example
November 21 '24 @ 00:22
Updated Nov 21
Updated Nov 21
Updated Nov 21
Updated Sep 25
22dfbb7
Merge pull request schultek#290 from schultek/improvement/docs-next
e41de82
add import assists
There is a lot of "tutorials" out there teaching React and Redux. Most of them cover a lot more than what is actually useful for building production applications. Unfortunately this makes it really hard for beginners to understand how much they actually need to learn in order to be efficient.
Having built a fair amount of frontend applications using React/Redux or an equivalent, on iOS for example, or with Elm, with F#... I thought I'd share what I found to be the fundamentals of building frontend applications with React and using Redux's Unidirectional Dataflow architecture.
In React, there are only a few things needed to build full-fledged production applications. Like for any other frontend applications, you'll need to be able to manage state, load state from remote APIs asynchronously, and have access to state and configuration in deep nested object structures.
Most of these React features can be used in functional components via the use of hooks.
This function lets you create a state holder and a way to modify state while automatically updating any view components using that state.
This React hook lets you trigger side effects. A typical example of a side effect is loading remote data asynchronously then updating state.
The useEffect
function lets you pass-in dependencies
that would trigger the effect again if they changed.
The function passed to useEffect
can also return a function that
will be called when the view component is removed/dismounted.
This is useful for ensuring asynchronous side effects no longer happen
when the state is no longer available.
React's context
is designed to help inject values in deeply nested view
component trees. It is convenient for injecting configuration or shared stated.
If you are going to use it for storing state, you might instead consider using
Redux
.
You can't write React without using its testing library. If you don't write tests for your React applications, it's time you change that bad habit. When combined with the Jest test runner, it is the fastest and simplest way to test your view components. While it does not remove entirely the need for end-to-end testing, with something like Cypress for example, it is worth learning and having thorough of your components.
When your application starts growing, the ability to share state and update it across components will become more and more important.
While this is all possible using the standard React hooks for state and context management, it will become increasingly difficult to maintain over time if multiplying contexts and passing down state and state setters to child components.
Redux provides a unified and central place for managing shared state. It was designed after the Elm architecture.
Redux is a tool for managing state. The first thing to define is the shape of that state.
In Typescript, one would define an Interface
or a Type
describing it.
For example:
interface ApplicationState {
session: SessionState
todoItems: RemoteData<Todo[]>
}
Actions are any javascript with a type field that's a string. During the runtime of the application, Actions can be triggered to modify the state.
For example:
type ApplicationAction =
| {type: 'session/sign in', user: User}
| {type: 'session/sign out'}
| {type: 'todo/load', todoList: Todo[]}
| {type: 'todo/add', newTodo: Todo}
The reducer is the function that will take the current state, an action and produce a new state.
For example:
const reducer = (state: ApplicationState|undefined = initialState, action: AnyAction): ApplicationState => {
if (!isApplicationAction(action)) {
return state;
}
switch (action.type) {
//...
}
}
All three of the above are combined into a Store
. The store's purpose is:
The Provider
is a react context provider that holds a reference to the Redux store.
It is used by the two following hooks.
useSelector
is a React hook that allows subscribing to a part of the state.
It takes a transform function that takes the Application State and returns the part
of the state your component needs to render.
useDispatch
returns a dispatch
function. This function can be invoked in order to
trigger an Action
on the Application Store.
That's a wrap!
While there are plenty other things you could try to learn about React and Redux and the latest fancy library people use with them, the items above are all you will need to build a production quality application.
I do recommend using Typescript and test driving your application, but I cannot recommend pulling in external libraries to "solve" your development problems.
Additional libraries will tend to introduce:
Stay lean and good luck out there.
This blog post was originally posted on the initialCapacity website
We are sharing the source code to our custom project monitor. This is a great way to get started with programming in F# and grasping stateful application architecture.
We recently built our own project monitor to keep track of the status of our continuous integration builds. We’ve built a few over the past decade or so and decided to take a slightly different approach this time by building a desktop application in F#.
The application is running on a local computer connected to a 55” TV monitor in our office. The machine is an Intel NUC running Pop!_OS. So, that’s right, the app was written in a functional first language, built on Windows, deployed on Linux.
We decided to go for a cross-platform desktop application to make the app easier to deploy and configure on individual, commodity machines that were dormant and likely laying around our office collecting dust. Since it’s easy to compile F# for any platform we could have deployed the app to a Raspberry PI or a Mac Mini. In addition, we’re not paying for any hosting costs related to configuring or serving up a web application.
A screenshot of the monitor.
Running the application requires you to pass in the path to a JSON configuration file. The JSON file should follow the structure from the provided sample. We could have spent more time building a fancy UI but in the spirit of starting simple we favored being able to ship a binary alongside a JSON file - which is much more convenient for our use case.
Here is a quick look at the technologies we used to build the application -
As previously mentioned, the application is developed with the cross-platform desktop application framework AvaloniaUI and its F# companion library Avalonia.FuncUI.
The application launches a single window which runs a small Elm-ish application, implementing a Unidirectional Data Flow architecture. This architecture was originally introduced by the Elm programming suite and popularized by Redux.
When building stateful applications like desktop applications, native mobile applications, or web frontend applications, it becomes increasingly important to understand how to deal with state. We have found this paradigm shift new to the majority of companies that we’ve worked with over the years. Unidirectional data flow is one of the cleanest ways of thinking about UI and its state. The architecture relies heavily on the UI being represented by pure functions and not thinking about how the UI changes overtime - but how individual areas of the application should render given the current state.
State is changed through dispatching events and is decoupled from the rendering of the view itself.
The application supports displaying 1 to 6 projects at the time this article is published. To support more projects, we can change the Layout module to support different sized grids. Understanding AvaloniaUI's Grid is a great starting point to better understand the layout module.
While the GitHub Action is already configured, publishing for Linux, MacOS or Windows is a one line command:
dotnet publish -c release -r <release-identifier>
Release identifiers can be, for example: osx-x64
, linux-x64
, win10-x64
and they can be targeted
from any of these operating systems, effectively cross compiling the resulting binary.
That’s a wrap! We hope you enjoyed the article.
© Initial Capacity, Inc. All rights reserved.
This article is about leveraging a technique called Railway Oriented Programming, in Kotlin. It is extensively documented in functional languages, particularly well in the F# community. So I’m going to try to explain how to implement some of it in Kotlin.
Having written my fair share of Java, Go, Ruby… I’ve seen quite a few different paradigms for error handling.
In Ruby, one would return different types based on the error status of a
given function. We would (for example) use symbols to indicate the specific type
of error that was reached (e.g. :not_found
, :connection_failed
…).
It then becomes the responsibility of the consumer of the function to figure out the different possible results. The programmer ends up having to read the tests for the function, relying on the documentation being accurate, or reading through the code of the function itself.
In Java, we use exceptions for indicating the function is not successful.
Non-Runtime
exceptions have to be caught and handled, which ends up with a lot
of code like this -
try {
myFunction();
} catch (IOException e) {
throw new RuntimeException(e);
}
And that obviously can result with a lot of run-time problems…
In Go, a function can have multiple return values. The convention is to return an error and the value that is wanted. Then the programmer has to check for the error before continuing the execution. This results in code similar to this -
value, err := myFunction()
if err != nil {
return nil, err
}
Unfortunately, it can be very easy to forget to handle the error case. The
compiler will be just fine if we forget to look at the err
variable or if we
don’t assign it. Also this has the unfortunate side effect of spreading the
“happy path” code in many small chunks of code separated by error checks.
Although I am far from being an expert (really far), I have been toying around with some functional languages lately. In particular, I like the simplicity of Elm and F#, but I’m looking forward to learning more about advanced functional programming with Haskell and/or Scala eventually.
Regardless, in all these languages there is the concept of a discriminated union in F# or union type in Elm. It allows the programmer to represent a type that can have one or many states that can each have their own complexity. Think about it as an “enum on steroids”! Actually Rust and Swift enums are union types.
For example in F# you can create an Optional
type like this -
type Optional<'a> =
| Just of 'a
| Nothing
That means that a value of type Optional<string>
can either have the value
Nothing
or it can be Just
and would contain something of type string
. This
Optional
type is a great way of representing the potential absence of a value,
and it helps avoiding null
pointer exceptions. Now you might say “but **
Kotlin**
already has a way to avoid null pointer exceptions built-in”, and you are right.
So let’s look at a type that is built-into F#.
type Result<'success, 'error> =
| Success of 'success
| Error of 'error
If I write a function that returns something of
type Result<User, ErrorMessage>
then I know that I will either get a Success
back containing a User
or I
will get an Error
back and it contains an ErrorMessage
. And the F#
compiler would ask me to handle both cases.
This is actually very similar to a type that you will find in most functional
languages, Either
. It
exists in Scala
and in Haskell.
And now you might say “but does Kotlin even have any way to do that at all?!”, and you are in luck, because it does!
The same type that we just represented in F# can be represented as follows in Kotlin.
sealed class Result<T, E>
data class Success<T, E>(val value: T): Result<T, E>()
data class Error<T, E>(val value: E): Result<T, E>()
And you could use the type like this:
data class User(val name: String)
data class ErrorMessage(val message: String)
fun myFunction(): Result<User, ErrorMessage> =
Error(ErrorMessage("Oops"))
when (val result = myFunction()) {
is Success -> println("Success we got the user ${result.value.name}")
is Error -> println("Oops we got a failure ${result.value.message}")
}
Now this is very basic but already usable, and the compiler will require that we
do match both cases: Success
and Error
. It may seem a bit tedious to always
have to match on result after calling the function. After all, the extra
boilerplate is why Java developers tend to use a lot of RuntimeException
s
instead of having to catch or re-throw them all over the place.
So let’s add a few functions to the Result
class to help handle it.
sealed class Result<T, E> {
abstract fun <NewT> map(mapping: (T) -> NewT): Result<NewT, E>
abstract fun <NewT> flatMap(mapping: (T) -> Result<NewT, E>): Result<NewT, E>
abstract fun <NewE> mapFailure(mapping: (E) -> NewE): Result<T, NewE>
abstract fun <NewE> flatMapFailure(mapping: (E) -> Result<T, NewE>): Result<T, NewE>
abstract fun orElse(other: T): T
abstract fun orElse(function: (E) -> T): T
}
The full implementation can be found as a Gist on my Github.
With these functions you will be able to write code that handles errors very simply and concisely. For example,
fun fetchUsers(): Result<List<User>, ErrorMessage> =
buildRequest("GET", "http://example.com/api/users")
.execute()
.flatMap { it.parseJson<UserListJson>() }
.map { it.users }
In this example, I executed an HTTP request using a function that returns a
Result
then I parsed the response if the Result
was a Success
. The parsing
is also a function that returns a Result
so I used flatMap
. Finally I return
the list of Users
from the parsed UserListJson
.
At no point in that function did I have to handle the error branches (because my
functions are always using ErrorMessage
for the failure case).
This makes for code that is a lot easier to maintain. The compiler is going to do most of the heavy lifting for us.
This is Railway Oriented Programming (I highly recommend reading that article).
I would encourage you to try and use this style of programming more and more if
you have the privilege of using a language that offers this kind of feature. If
you are using any external library that throws exceptions, make sure to write
some small wrapper functions that will instead return a Result
type.
Enjoy your exception free codebase!
When I started working on Aspen, I was focusing on only a few things: I want an easy way to regroup my tests for a given function, and I want to be able to name my tests with a simple sentence but I don’t want to have to name my tests. That lead to version 1.0.
Then came Spring integration, version 1.1. Then we started talking to more people to see what they wanted, and it became quickly obvious that a very simple DSL was not going to be enough for some. So I started working on another DSL that would allow nesting of the tree structure, like rSpec does. This lead to version 1.2.
During the creation of that second DSL, I tried to figure out what was the right abstraction for it. It became obvious that we are building a tree structure and running that. So now I’m going to show you how to create your own DSL that builds a tree structure for Aspen.
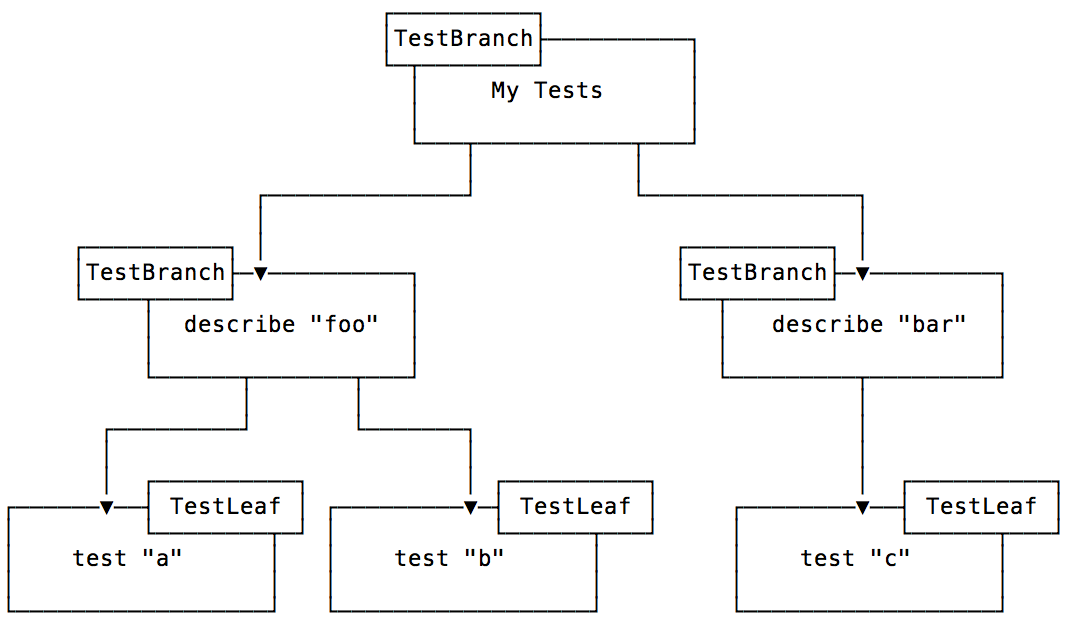
The goal of the DSL is to build a TestTree that can then be run by the TestTreeRunner from Aspen. For example, with the built-in DSL, the following code…
class MyTests: Test({
describe("foo") {
test("a") {
}
test("b") {
}
}
describe("bar") {
test("c") {
}
}
})
…would build the following structure.
An Aspen DSL implements the TestTree Interface.
interface TestTree {
fun readTestBody()
fun getRoot(): TestBranch
}
The readTestBody
function is the one that is supposed to evaluate the body of
the tests and build the tree structure, thus making the root available. It is
invoked at a particular time in the SpringTestTreeRunner for instance, the
default TestTreeRunner invokes it as soon as it needs to browse the tree.
The getRoot
function is more obvious, it returns the first branch of your
Tree.
A TestBranch
has children
and optional before
and after
blocks. Its
children can be of type TestBranch
or TestLeaf
. A TestLeaf
represents an
actual test, it has a block of code to execute and can have a focused flag.
All the code for the TestTree
is in a single file:
https://github.com/dam5s/aspen/blob/master/libraries/aspen/src/main/kotlin/io/damo/aspen/TestTree.kt
Let’s start with the easy part, implementing the TestTree interface:
@RunWith(TestTreeRunner::class)
open class Test : TestTree {
private val root = TestBranch.createRoot()
private val body: Test.() -> Unit
constructor(body: Test.() -> Unit) {
this.body = body
}
override fun getRoot() = root
override fun readTestBody() {
this.body.invoke(this)
}
}
This is an open class that is run with the TestTreeRunner
and implements
TestTree
. The root is created with TestBranch.createRoot
, creating a branch
without parent, without name… The body is an extension function for the class
itself, this is the block of code that will contain your tests and build the
TestTree
structure, it is evaluated in the readTestBody
function.
Now you can start adding some functions that will help you build the tree.
This will allow specifying the before and after block:
fun before(block: () -> Unit) {
root.before = block
}
fun after(block: () -> Unit) {
root.after = block
}
This will add a test at the root level:
fun test(name: Any = "unnamed test", block: () -> Unit) {
root.addChildLeaf(name.toString(), block)
}
Now in order to add branches that do not allow nesting, we have to create a function that will take an extension function for a different type. If it was for the same type, then we would be able to call that same function over and over.
fun describe(name: Any, block: TestDescription.() -> Unit) {
val newBranch = root.addChildBranch(name.toString())
TestDescription(newBranch).block()
}
The TestDescription
only allows adding tests:
class TestDescription(private val branch: TestBranch) {
fun test(name: String = "unnamed test", block: () -> Unit) {
branch.addChildLeaf(name, block)
}
}
And that’s it! From that point you can start making your DSL even smarter.
For instance, I have been working on making a DSL for nicer table based tests. You can see its first implementation on Github. It would allow for writing a test like this:
class MathTest : Test({
class MaxData(context: String, val a: Int, val b: Int, val c: Int)
: TestData(context)
val testData = listOf(
MaxData("when equal", 2, 2, 2),
MaxData("when a is greater", 3, 1, 3),
MaxData("when b is greater", 3, 4, 4)
)
tableTest(testData) {
test {
assertThat(Math.max(a, b), equalTo(c))
}
}
})
But it is still a work in progress, as I still need to figure out exactly how I want my test to look like (that test block does not look useful for instance).
I hope this convinced you that it’s very simple to write your own type safe DSL for testing with Aspen. Let me know what you think about it!
TL;DR — Aspen 2.0 is out, check it out: https://github.com/dam5s/aspen
I started looking at Kotlin around release M9, it was quite a few months before it was released as 1.0, but it was already very usable. Kotlin promised easy integration with your Java code, running on the Java 6 VM and a lot of features that make the code a lot nicer to work with.
Having worked with Java for a couple years with some of our clients, I was really excited to get rid of the verbosity and keep the things I like in Java: a good build system (Gradle), easy to build modular applications, a decent type system (that gets improved a lot by Kotlin), and a huge ecosystem with mature libraries.
Our first production project for a client was using Kotlin M12 for an Android application. The experience was great, the client developers were former C# developers. They loved the language, and despite a few quirks here and there, we shipped it by the time Kotlin M13 was released. A few weeks later, Kotlin 1.0 was released.
Now I have been through a couple more projects with Kotlin and I would advise any Java developer out there to look into it. It’s easy to get started with, and you can introduce it in your existing projects without pain.
I have been really enjoying the simplicity of Java unit tests using JUnit. Its simplicity encourages you to write simple tests that are easy to read. Using only one “@Before” annotated function encourages you to make each test readable from top to bottom without having to jump around.
The only thing I really miss from my Ruby days was being able to write a short sentence to describe my test. With JUnit, I would name tests following this pattern:
public void testMyFunction // testing the happy path
public void testMyFunction_WhenInput... // testing another context
Some developers would also describe the expected outcome in the function name. I do not do that because I want to encourage developers in my team to name variables and write assertions that talk for themselves. Also I do not want to have yet another comment that can get out of sync easily.
Kotlin allowing to create type safe DSLs, I decided to write a DSL for testing. It is inspired by RSpec and Spek, but it is a lot simplified and easy to extend with your own DSL if you would like.
An Aspen test looks like this:
class PersonTestExample : Test({
describe("#fullName") {
test {
val person = buildPerson(
firstName = "Jane",
lastName = "Doe"
)
assertThat(person.fullName(), equalTo("Jane Doe"))
}
test("with a middle name") {
val person = buildPerson(
firstName = "John",
middleName = "William",
lastName = "Doe"
)
assertThat(person.fullName(), equalTo("John W. Doe"))
}
}
describe("#greeting") {
test {
val person = buildPerson(
firstName = "Jane",
lastName = "Doe"
)
assertThat(person.greeting(), equalTo("Greetings Jane!"))
}
}
})
With the help of a few colleagues (Joe, Jack, Mike G, Travis, Nathan, Alex… thanks guys!), we wrote Aspen. It’s a really simple DSL that makes unit tests easier to organize, and it’s built on top of JUnit.
A big requirement for us to use a testing framework: it has to work with Spring. Most of the tests we write with Spring are pure unit tests, so that already just works. But we also have a few tests that require us to use the Spring test runner in order to spin up the server and run some higher level tests.
Thankfully the Spring team has done a great job at abstracting the way the Spring runner work. It’s been very easy to write our own runner for Spring that reuses the code by the Spring team.
A test with Aspen Spring can look like this:
@RunWith(SpringTestTreeRunner::class)
@SpringApplicationConfiguration(ExampleApplication::class)
@WebIntegrationTest("server.port:0")
class SpringApplicationTestExample : Test({
val message: String = inject("myMessage")
val port = injectValue("local.server.port", Int::class)
val client = OkHttpClient()
test("GET /hello") {
val request = Request.Builder()
.url("http://localhost:$port/hello")
.build()
val response = client.newCall(request).execute()
val body = response.body().string()
assertThat(body, equalTo("""{"hello":"world"}"""))
assertThat(body, equalTo("""{"hello":"$message"}"""))
}
test("GET /world") {
//...
}
})
Instructions for setting up Aspen and Aspen Spring are on my Github.
Full Changelog: release/0.6.0...release/0.7.0